Showing posts with label cheese. Show all posts

Saturday, May 25, 2013

Giada's Macaroni and Cheese

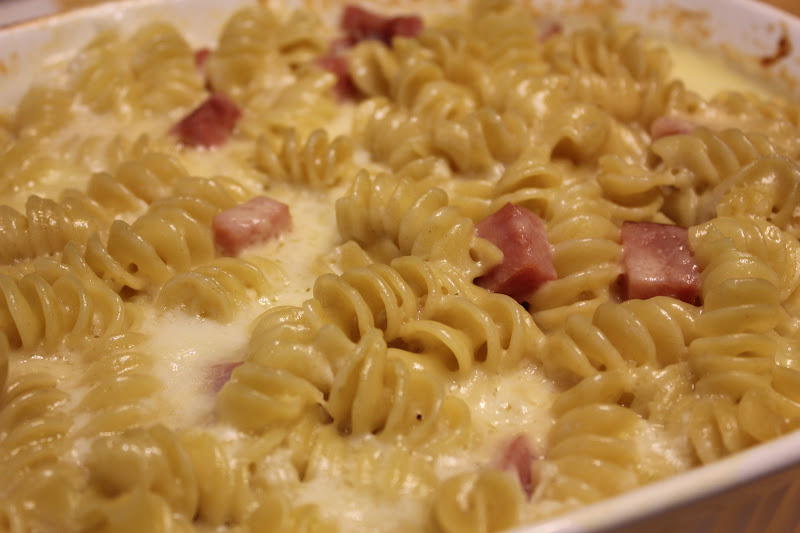
This week is the May Potluck at I Heart Cooking Clubs.  Participants can choose any of the former featured chefs and cook any of his or her recipes.  Since Ottolenghi is the first chef that I'm cooking with, I had a lot of chefs to choose from.  In the April Potluck I made a Jamie Oliver recipe.  This month I decided to cook one of Giada De Laurentiis' recipes.  I'm not sure that I've ever cooked any of her dishes before, though I have watched many of her shows on the foodnetwork.  I had some leftover ham in the freezer and I knew I couldn't go wrong with mac and cheese.  My kids LOVE the boxed mac and cheese.  I have tried many different homemade versions of the dish since they love it so much.  But I always get the same response, "I like the boxed one better!"  This version of mac and cheese has no cheddar.  So it's really different than what my kids are used to. Although they ate it and my daughter requested some for lunch the next day, the boxed stuff still rules for them.  This dish is really cheesy.  I substituted swiss cheese for fontina, added ham, which was optional in the original recipe, and left out the Italian parsley. Definitely not cooking "light" with this one.  But with the recent rainy and chilly weather we've been having it was actually quite the comfort food.


Macaroni and Cheese
Recipe slightly adapted from foodnetwork.com, courtesy of Giada De Laurentiis

Ingredients:
Butter, for greasing dish
12 ounces wide egg noodles
2 cups heavy cream
2 1/2 cups milk
2 teaspoons all-purpose flour
1/2 teaspoon salt
1/4 teaspoon freshly ground black pepper
2 cups grated Swiss
3/4 cup finely grated Parmesan
3/4 cup grated mozzarella
4 ounces cooked ham, diced
Directions:
Preheat the oven to 450 degrees F.

Butter a 13 by 9-inch glass baking dish and set aside. Cook the noodles in a large pot of boiling salted water, about 5 minutes. Drain well, but do not rinse.

Whisk the cream, milk, flour, 1/2 teaspoon salt, and pepper in large bowl to blend. Stir in 1 cup Swiss, 1/2 cup Parmesan, 1/2 cup mozzarella, and ham. Add the noodles and toss to coat. Transfer the noodle mixture to the prepared baking dish. Toss the remaining 1 cup Swiss, 1/4 cup Parmesan, and 1/4 cup mozzarella in a small bowl to blend. Sprinkle the cheese mixture over the noodle mixture. Bake until the sauce bubbles and the cheese melts and begins to brown on top, about 20 minutes. Let stand for 10 minutes before serving.

Family Rating: 1 1/2 thumbs up.

Tuesday, April 23, 2013

Roasted Broccoli and Aged Cheddar Gratin

This was the last veggie side that I made for our Easter dinner.  I think broccoli is one of the only vegetables that BOTH of my kids will eat without complaint.  I wanted to do something besides steam it.  I saw a recipe for Roasted Cauliflower and Aged White Cheddar Gratin on Closet Cooking.  I didn't want to use cauliflower, but used that recipe for the inspiration for this dish.  I substituted broccoli and omitted/added various ingredients until I had this dish.  It was tasty and the kids enjoyed it. 

Roasted Broccoli and Aged Cheddar Gratin
recipe inspired by Closet Cooking

Ingredients:
1 large head broccoli, cut into florets
2 tablespoons oil
salt and pepper to taste
3 tablespoons butter
3 tablespoons flour
1 1/2 cups milk
salt and pepper to taste
2 tablespoons dijon mustard
1 cup aged cheddar cheese, shredded
1/2 cup bread crumbs

Directions:
1. Preheat oven to 400 degrees F. Toss the broccoli florets in the oil along with the salt and pepper and arrange them in a single layer on a large baking sheet.

2.Roast the broccoli in until lightly golden brown, about 20-30 minutes.  Once broccoli is roasted, reduce oven heat to 350 degrees F.

3.Melt the butter in a saucepan over medium heat, mix in the flour and let cook until it just starts to brown a little.

4.Mix in the milk, salt, pepper, dijon mustard, and cheese and heat until the cheese melts and the sauce thickens.

5.Mix broccoli into the sauce, pour into a baking dish and top with the bread crumbs.

6.Bake in oven until it is bubbling on the sides and golden brown on top, about 15-20 minutes.

Family Rating: 1 1/2 thumbs up.

This post is shared at:
Tasty Thursdays @ The Mandatory Mooch
One Project at a Time @ A Bowl Full of Lemons

Friday, April 12, 2013

Hawaiian Pizza Grilled Cheese Sandwich

I mentioned in yesterday's post that I made these sandwiches to go with the Green Gazpacho.  The kids didn't enjoy the soup but they loved these sandwiches.  That wasn't hard to predict!  I hadn't made grilled cheese in a loooong time and needed something quick and easy to go with the gazpacho.  These were definitely quick and easy.  My kids love all of these ingredients on their own, so I knew they'd enjoy them in a sandwich form.  As you can see from my photo, I wasn't patient enough to let the cheese get all gooey.  But this was tasty as is!  My husband told me he could go for another one, after he ate his first.  I told him that I unfortunately used up all of the bread in making these. 


Hawaiian Pizza Grilled Cheese Sandwich
recipe slightly adapted from Cheese Curd In Paradise, inspired by Healthy Food for Living

Ingredients:
(for 4 sandwiches)

8 slices bread of your choice
2 cup tomato sauce
8 slices of low-moisture, part-skim mozzarella cheese
8 slices of deli ham (2 slices per sandwich)
4 pineapple rings
Butter

Directions:
In a skillet heat about one Tablespoon of butter over medium heat. On 8 slices of bread dab a small amount of butter on each side. Place 2 slices butter side down in skillet. Spread 1 Tbsp of tomato sauce onto each slice of bread in the skillet. Next, layer 2 slices of mozzarella, 1 pineapple ring, and  2 slices of ham.  Top with remaining 2 slices of bread. 

Cook sandwiches until golden brown on the bottom, about 3-4 minutes. Flip sandwiches and cook until golden brown on the other side and the cheese has fully melted, about 3-4 remaining minutes. If the bread turns golden brown before the cheese has fully melted, reduced stove heat to low. Remove from heat and repeat for next two sandwiches.

Family Rating: 1 thumb up.

Friday, March 8, 2013

Black Bean Quesadillas with Goat Cheese

Last weekend we went down to NYC to attend a free Kids Food Festival in Bryant Park, which was sponsored in part by Cooking Light and the James Beard Foundation.  We could have bought tickets to see cooking demos, from chefs like Ellie Krieger and Jehangir Mehta.  Unfortunately, at $20 a ticket, I didn't think they were quite old enough to really appreciate seeing the chefs or eat what they were making.....maybe next year!  But we had lots of fun going to different booths and trying different snack foods, getting their booklets stamped, and dancing with "Baby Loves Disco."  I wish the weather was a little warmer because we would have stayed longer.  There were several free demonstrations and performances, but since the festival was outside, it was a bit chilly.  We ended up leaving after about two hours and met up with my brother-in-law, who lives down in the city and went out to lunch.  Before we left, we had watched a demo from cookbook author Katie Workman, who made tacos and edamame. Workman was pointing out that tacos are a great kid-friendly food because kids can help prepare the ingredients and then choose what they want to put on their own tacos.  My go-to quick Mexican type meal though is quesadillas.  There are so many different combos you can make, both with meat or without, like this version. 

I don't know if it's a texture thing or what, but I don't like most types of beans.  Only over the past year or so have I started liking black beans.  But have I mentioned how much I LOVE goat cheese?  I think I'd like these, even if I didn't like black beans, because goat cheese makes everything taste better!  Really though these quesadillas were super tasty!  My son loves all kinds of cheese and black beans....so he liked these.  My daughter on the other hand does not really like cheese.  She's usually really good about eating what she needs to to get a treat, and she ended up eating three pieces of this quesadilla.  I served this with yellow rice and some veggies to complete the meal.

Black Bean Quesadillas with Goat Cheese
recipe from Cooking Light, June 2001

Ingredients:
2 teaspoons olive oil, divided
1 cup chopped onion
2 garlic cloves, minced
1/2 cup salsa
1/4 teaspoon ground cumin
1 (19-ounce) can black beans, undrained
1/3 cup minced fresh cilantro
1 (4-ounce) package goat cheese, crumbled
8 (8-inch) flour tortillas
1/2 cup fat-free sour cream
1/2 cup salsa

Directions:
Heat 1 teaspoon olive oil in a large nonstick skillet over medium-high heat. Add the onion and garlic, and saute for 3 minutes. Stir in 1/2 cup salsa, cumin, and beans, and bring to a boil. Reduce heat, and simmer for 5 minutes or until thick. Mash the bean mixture slightly with a potato masher. Remove from heat; stir in the cilantro and goat cheese.

Spread the bean mixture evenly over 4 tortillas; top each with 1 tortilla, pressing gently.

Heat 1/4 teaspoon olive oil in pan over medium-high heat. Add 1 quesadilla, and cook for 2 minutes on each side. Repeat the procedure with the remaining olive oil and quesadillas. Cut each quesadilla into 6 wedges. Serve with fat-free sour cream and 1/2 cup salsa.

Family Rating: 1 1/2 thumbs up.

This post is shared at:
Foodtastic Friday @ Not Your Ordinary Recipes
Tasty Thursdays @ The Mandatory Mooch
Full Plate Thursday @ Miz Helen's Country Cottage

Thursday, February 21, 2013

Cheesy Grilled Eggplant Sandwiches

I have been debating whether to get a grill pan for awhile now.  In the summer my husband is the "grill master" and uses our Weber charcoal grill a lot.  I do not know how to use the charcoal grill, nor do I really want to use it!  But I have so many "grilled" recipes that I'm not sure I'll ever be able to make.  I almost bought a cast-iron grill pan.  But we already own a cast-iron pan.  The only difference this pan would make would be to put "grill" marks onto the food!  So I decided against it.  As my husband pointed out, we own a George Foreman grill, that we haven't used in years!  So I made these sandwiches by grilling the eggplant on the George Foreman and then cooking the sandwiches on it to get the "grill" marks.  The good thing about these sandwiches is that I was able to customize the kids' sandwiches.  My daughter doesn't like cheese, neither of the kids wanted eggplant (although they had to have a taste!), and so on.  My husband and I found these to be really tasty.  But of course, we love any excuse to eat prosciutto!!!
Cheesy Grilled Eggplant Sandwiches
Recipe slightly adapted from EveryDay with Rachael Ray, August 2008

Ingredients:
1 pound small eggplants, trimmed and thinly sliced lengthwise
1/4 cup extra-virgin olive oil
Salt and pepper
8 slices Italian bread
4 slices Swiss cheese, torn into two pieces
4 ounces  thinly sliced prosciutto

Directions:
1.Preheat a grill to medium. In a large bowl, toss the eggplant slices with 2 tablespoons olive oil; season with salt and pepper. Grill, turning once, until softened, about 4 minutes.

2.Lay the bread on a work surface. Top 4 slices with a layer each of cheese, prosciutto, eggplant and another layer of prosciutto and cheese. Top with the remaining bread slices.

3.Brush the outside of the sandwiches with the remaining 2 tablespoons olive oil. Grill, covered, turning once, until crisp, about 2 minutes.

 Family Rating: 1 1/2 thumbs up.  

This post is shared at:
Full Plate Thursday @ Miz Helen's Country Cottage
Tasty Thursdays @ The Mandatory Mooch
Foodtastic Friday @ Not Your Ordinary Recipes

Sunday, February 17, 2013

Apple Cheese Beer Bread

I made clam chowder the other day (see upcoming post).  To me soup is not a meal and I have to serve it either with a sandwich or bread of some type.  I have had this bread recipe bookmarked for awhile and thought that it would be a good time to make it.  The recipe below makes two loaves but I ended up halving it.  This was so easy to put together and we all enjoyed it!


Apple Cheese Beer Bread
recipe from Edesia's Notebook

Ingredients:
1 tbsp olive oil
½ cup shallots, minced
½ cup apple, peeled and shredded (use paper towel to remove any excess moisture)
3 cups flour
3 tbsp sugar
2 tsp baking powder
1 tsp salt
1 cup cheddar cheese, shredded
12 oz. beer
½ cup applesauce

Directions:
Preheat oven to 375°. Heat oil in skillet. Cook shallots and apple for 7 minutes. Mix dry ingredients in large bowl. Add cooked apple mixture, beer, applesauce, and cheese, stirring just until moist. Spoon mixture into 2 greased bread pans. Bake for 40 minutes or until done. Cool in pan for 5 minutes then remove and cool on wire rack.

Family Rating: 2 thumbs up.

Thursday, November 29, 2012

Recipe Repeat: Baked Macaroni & Cheddar

I originally found this recipe in an issue of EveryDay with Rachael Ray back from 2008.  I had made it once before, but not sure when.  I figured if I had saved the magazine tear-out it must have been good.  You can't really go wrong with mac & cheese.  Plus, this recipe has broccoli in it, so I didn't need to make any extra veggies!   My kids love mac & cheese and broccoli, so of course this was a hit with them! 

Baked Macaroni & Cheese
recipe from EveryDay with Rachael Ray, April 2008

Ingredients:
1 large bunch broccoli, cut into bite-size florets and stalks peeled and cut into 1/2-inch cubes
1 pound whole wheat elbow pasta
2 1/2 tablespoons butter
1/2 cup finely chopped shallots (about 3)
3 tablespoons flour
3 1/2 cups low-fat milk
3 tablespoons cornstarch
12 ounces cheddar cheese, cut into small cubes
6 tablespoons grated parmesan cheese
Salt and pepper
1 clove garlic, smashed
3 tablespoons bread crumbs

Directions:
1.Fill a large pot with enough water to reach a depth of 2 inches and bring to a boil. Add the broccoli and cook for 1 minute; drain and rinse with cold water. Grease a 9-by-13-inch baking dish and add the broccoli in an even layer.

2.Fill the same pot with salted water and bring to a boil. Add the pasta and cook until al dente; drain.

3.Position a rack in the upper third of the oven and preheat to 400 degrees . In the same pot, melt 2 tablespoons butter over medium heat. Add the shallots and cook, stirring, until softened, 3 to 4 minutes. Stir in the flour for 1 minute. Whisk in 1 cup milk until thickened, then whisk in 1 cup more. Whisk the cornstarch into the remaining 1 1/2 cups milk, then whisk the mixture into the pot. Simmer, whisking, until the sauce thickens, 2 to 3 minutes. Lower the heat and stir in the cheddar and 4 tablespoons parmesan. Season with salt and pepper, then stir in the pasta. Spoon the mixture over the broccoli.

4.In a small heatproof bowl, combine the garlic and remaining 1/2 tablespoon butter; microwave at high power until melted, about 20 seconds. Stir in the bread crumbs, the remaining 2 tablespoons parmesan and 1/4 teaspoon each salt and pepper. Discard the garlic, then sprinkle the bread crumb mixture on the pasta. Bake until golden, about 15 minutes. Let cool slightly before serving.

Family Rating: 2 thumbs up!

This post is shared at:
Full Plate Thursday @ Miz Helen's Country Cottage
Creative Thursday @ Michelle's Tasty Creations
Showcase Your Talent Thursday @ What's Cooking, Love

Friday, October 5, 2012

Turkey Apple Swiss Melt

I have a feeling that sandwiches are going to be a go-to dinner for us soon.  They are usually really quick to make and I can serve them with soup, since I can't eat just soup for dinner.  Cold fall and winter nights are perfect for a soup and sandwich dinner combo.  I haven't made any soup yet, but I recently made this sandwich.  When I was growing up grilled cheese involved the yellow american cheese slices in the plastic wrapper, which was never my favorite.  There are so many types of cheese/bread combos out there the choices are endless!  Unfortunately, I have a daughter who doesn't really like cheese....unless it's on pizza.  She does like turkey and apples and that's why I made this recipe.  I made hers without the cheeese and the rest of us had it as the recipe directed. I even had mine without the honey mustard sauce since I don't like mustard very much.  Sandwiches = easy customization!  The flavors of this sandwich worked well together.  The tart apple, sweet turkey, and tangy swiss.  This was an easy and tasty sandwich perfect for a quick weeknight dinner.

Turkey Apple Swiss Melt
recipe slightly adapted from Cooking Light, September 2012

Ingredients:
1 tablespoon Dijon mustard
1 tablespoon honey
8 (1-ounce) slices bread
4 (1-ounce) slices Swiss cheese
5 ounces thinly sliced Granny Smith apple (about 1 small)
8 ounces thinly sliced maple turkey breast
Cooking spray

Directions:
1. Combine mustard and honey in a small bowl. Spread one side of each of 4 bread slices with 1 1/2 teaspoons mustard mixture. Place one cheese slice on dressed side of bread slices; top each with 5 apple slices and 2 ounces turkey. Top sandwiches with remaining 4 bread slices. Coat both sides of sandwiches with cooking spray. Heat a large nonstick skillet over medium-high heat. Add sandwiches to pan. Cook 2 minutes on each side or until bread is browned and cheese melts.

Family Rating: 1 1/2 thumbs up.

Tuesday, September 18, 2012

Cheesy Baked Penne With Ham

This dish is a twist on the usual mac and cheese....which my kids LOVE!  Making this recipe took two trips to the grocery store though.  I sent my husband to the grocery store one night to pick up a few things.  He thought he grabbed provolone but instead grabbed a triangle of parmesan cheese.  So I went back to the grocery store the day I planned on making this.  While my kids love ham I was afraid that my daughter wouldn't like this because of the provolone cheese.  She doesn't like the stuff.  Once melted into the sauce and mixed in with the pasta though it was very mild (and I bought a mild provolone!). We all ended up enjoying this dish.  This does require a little prep (making the sauce, cooking the pasta, etc.) and then some baking time.  But we thought that it was definitely worth it!  It's a warming, comfort-type dish perfect for the colder weather coming up!


Cheesy Baked Penne with Ham
recipe slightly adapted from Mandy's Recipe Box

Ingredients:

Sauce:
4 cups 2% milk
4 Tbsp. (1/2 stick) unsalted butter
¼ cup all-purpose flour
1 freshly ground pepper, to taste

Pasta:
1 pound penne pasta, cooked until tender yet still firm to the bite
1 ½ cups diced ham
1 cup diced provolone cheese
1 cup freshly grated Parmesan cheese

Directions:
1. Prepare sauce: Heat milk in a medium saucepan until small bubbles form around the edges. In a larger saucepan, melt butter over medium-low heat. Add flour and stir well. Continue to cook, stirring, until thick and smooth, about 2 minutes. Slowly begin adding hot milk to the large saucepan, whisking constantly while adding. Sauce will start out lumpy and become smooth as milk is incorporated. Stir in freshly ground pepper. Turn heat up to medium and bring sauce to a simmer for an additional 2 minutes. Remove from heat and set aside while you prepare the pasta.

2. Preheat oven to 350 degrees F. Butter a shallow 2 1/2-quart baking dish.(I used a 9x13 dish)

3. Assemble the dish: In a large bowl, toss cooked pasta with the sauce. Stir in  ham, provolone and ¾ cup of the grated Parmesan. Scrape the mixture into the baking dish and sprinkle with the remaining Parmesan.

4. Cover with aluminum foil. Bake 25 minutes. Uncover and bake until sauce is bubbling around the edges and the center is hot (about 10 minutes more). Remove from the oven and let cool for about 10 minutes before serving.

Family Rating: 1 1/2 thumbs up.

Friday, August 3, 2012

Turkey and Onion Grilled Cheese

Normally, when I think of grilled cheese I think of the plastic wrapped yellow cheese on melted on some bread.....not a big fan.  So I don't really consider myself a grilled cheese lover.  I think I'm in the minority though as I recently saw a grilled cheese fast food type place at a rest stop last month!   My daughter has gymnastics on Wednesday afternoons which also coincides with shower nights so Wednesday dinners have to be easy and fast.  Besides caramelizing the onions, which is a bit time consuming, this recipe is really easy.  My 6 year old daughter can now make pretty good scrambled eggs on her own with adult supervision.  After this dinner, she can add grilled cheese to her repertoire!  She really wanted to help me make dinner so I had her do pretty much everything but cut the onions.  I didn't put onion on the kids' sandwiches and my daughter wanted the yellow American cheese in the plastic wrapper on hers. My hsuband and I had these sandwiches with the onions and all.  All I can say is yum!  But I think anything with caramelized onions gets a yum from me!  I could definitely eat a lot more of these. 

Turkey and Onion Grilled Cheese
recipe from SteakNPotatoesKindaGurl

Yield: 2 sandwiches

Ingredients:
1/2 of a red onion, sliced
2 tbsp butter
4 slices of bread of your choice
3 tbsp or so of butter, melted or softened
4 slices of maple turkey
4 slices of smoked gouda cheese

Directions:
In a medium skillet, add 2 tbsp butter until melted. Then add sliced red onion and saute until softened and golden brown.

Spread the bread slices with 3 tbsp softened butter. In a large skillet on medium-low, add 2 bread slices. . Top one slice of bread with 2 slices gouda. Then add 2 slices of maple turkey, then some sauteed red onions. Top with the other slice of bread. Press down with a spatula or heavy object. Once golden brown and delicious, flip and cook other side. Repeat with 2nd sandwich.

Mommy & Daddy Rating: 2 thumbs up!

Monday, July 30, 2012

Meatless Monday: Macaroni n Cheese Pancakes

Wednesdays in our house are pretty busy.  The kids are at two different camps and then after camp my daughter has gymnastics class.  Last Wednesday there was a special reptile show at the library that I had signed us up to go to at 7 p.m.  I knew that we'd be really crunched for time between coming home from gymnastics and getting ready for the show.  My daughter was home with me last Wednesday so I ended up making these pancakes for us for lunch and then they were already made for dinner for my son.  The kids loved these, but really, how couldn't they?  Pancakes plus mac & cheese?!!  Those are two of their favorite foods!  They ate these up and also had them for breakfast a couple of days too.  While this isn't "gourmet" food, it's nice every once in awhile knowing that I'm making a meal that I know the kids will enjoy!

Mac n Cheese Pancakes
recipe from Every Day With Rachael Ray April, 2012

Ingredients:
2 cups flour
1 tablespoon sugar
2 teaspoons baking powder
1 teaspoon coarse salt
2 1/3 cups buttermilk
2 eggs
2 tablespoons butter, melted
2 1/2 cups cooked macaroni (1 1/4 cups dried), preferably elbows, drained and cooled
1 1/2 cups grated cheddar
Maple syrup, for serving

Directions:
1.In a large bowl, whisk together the flour, sugar, baking powder and salt.

2.In a separate bowl, whisk together the buttermilk, eggs and butter. Add the liquid ingredients to the dry ingredients and whisk until just combined (the batter will be a bit lumpy). Using a spoon, fold in the macaroni and cheddar.

3.Preheat a griddle or large nonstick skillet over medium-low heat and lightly grease. Using a 1/4-cup measure and working in batches of 4, scoop the batter onto the griddle to make pancakes. Cook until the undersides are golden-brown and bubbles start to form on the top, about 5 minutes. Flip and cook until the second side is golden-brown, 3 to 4 minutes. repeat with the remaining pancake batter. Serve with maple syrup.

Family Rating: 1 1/2 thumbs up.

Friday, May 18, 2012

Velveeta Cheesy Bacon Hash Brown Bake

I found this recipe in a "velveeta recipes" internet search.  I thought it was perfect since we hadn't had breakfast for dinner in awhile.  Plus, it had bacon in it.....and my family LOVES bacon! This was pretty easy to put together, but it does need to cook for 40 minutes.  I didn't need to give the kids a shower tonight, so it was nice to play a game with them and then let them relax by watching a little television before dinner.  This was surprisingly tasty to me (since I'm not a big fan of the cheese!) and the kids ate theirs up, minus the mushrooms.  This made enough for us to have plenty of leftovers.  My daughter took some for lunch the next day, while it made a nice breakfast for my husband and I. 

Velveeta Cheesy Bacon Hash Brown Bake
from Mommy's Kitchen

Ingredients:
8 - slices bacon, chopped
2 - cups frozen shredded hash browns, thawed
1/2 lb. - fresh mushrooms, sliced
1 - onion, chopped
12 - eggs
1/3 cup -sour cream
3/4 lb. (12 oz.) - Velveeta Pasteurized Prepared Cheese Product, thinly sliced

Preparation:
HEAT oven to 350ºF. COOK bacon in large skillet on medium heat 10 min. or until crisp, stirring occasionally. Remove bacon from skillet, reserving 2 Tbsp. drippings in skillet. Drain bacon on paper towels. Meanwhile, add potatoes, mushrooms, and onions to drippings; cook approximately 10 min.  until onions are crisp-tender, stirring occasionally. SPREAD vegetable mixture onto bottom of 13x9-inch baking dish sprayed with cooking spray. Whisk eggs and sour cream until well blended; pour over vegetable mixture. Top with bacon and VELVEETA. BAKE 40 min. or until center is set and casserole is heated through.

Family Rating: 1 1/2 thumbs up!

Thursday, May 17, 2012

Velveeta Italian Sausage Bake

Awhile back I bought a block of velveeta cheese, planning to make something, which of course I never did.  Luckily, I was searching through my cabinets for something and found it and happened to notice that the use by date was coming up in about two weeks.  So, off I went on a search for velveeta recipes!  I found this one at one my favorite sites Moms Crazy Cooking.  I have to say that I'm not a big fan of the block of cheese.  The kids ate this up and even had it for lunch the next day.  But it was cheesy and had salty meat (sausage!), so of course they loved it!  If only I loved it as much as they did would it earn a 2 thumbs up.  This is one of those dishes that requires a little prep and then cook time, but during the cook time I can get the kids showered!


Velveeta Italian Sausage Bake
recipe slightly adapted from Moms Crazy Cooking

Ingredients:
1-1/2 cups Penne pasta
1 lb. Italian sausage
1 small zucchini, halved and sliced
1 can (6 oz.) tomato sauce
1 Tablespoon Penzys Pasta Sprinkle
1/2 lb. (8 oz.) VELVEETA Pasteurized Prepared Cheese Product, cut into 1/2-inch cubes
1/2 cup Grated Parmesan Cheese

Preparation:
Heat oven to 350 degrees F. Cook pasta as directed on package. Brown sausage in large skillet on medium-high heat, stirring occasionally to break up sausage. Drain; return sausage to skillet. Stir in zucchini, tomato sauce and pasta sprinkle; cook 5 to 6 min. or until zucchini is crisp-tender, stirring occasionally. Drain pasta; Add to sausage mixture with velveeta cheese; mix lightly. Spoon into 13x9-inch baking dish sprayed with cooking spray; top with Parmesan. Bake 15 to 20 min. or until heated through.

Family Rating: 1 thumb up.